

T-517 Flowers And Holly
S-1900 Tuxedo Black Memento Ink
TT-216 Haystack Palette Ink/ Brayer (This step is optional)
Copic Markers YG13, G29, R37, R59, V09, V17
V-290 Premium White Cardstock
K-299 Labels 9 Nestabilitie (Largest Die)
K-296 Standard Circles Large (2 3/8" Die)
Beeswax & Craft Iron
Cording,Tassel and 3/8" Velvet Ribbon
Corrugated Cardboard
Lt.Ivory Acrylic Paint & A-287 Prisma Glitter
Glue Dots, Zip Dry Glue
On my lunch hour I came up with this idea for a "Captivating Keepsake" entry.... and I couldn't wait to get home to make these! I'm happy to be sharing them with you and I hope they become a keepsake that you can hand down... I've always loved anything old and these have that old vintage look!
It all started when I discovered the wonderful small rib corrugated cardboard in the priority mailing boxes.... LOVE LOVE LOVE this stuff!!!
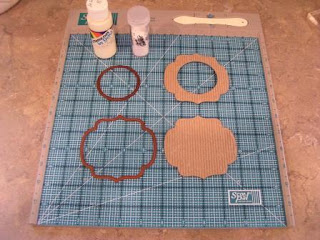
1. First peel the white paper from the front of your box and cut to a manageable size to run through your die cutting machine, you will need to cut out 2 of the largest size Labels 9, next center the 2 3/8" circle die inside 1 of your shapes and run back through with your die cutting machine you now have 1 solid shape for the back and 1 shape with a circle cutout in the front that will frame your stamped image.
2. Dry brush these with lt. Ivory paint. Leave some cardboard showing through makes them look old, next pour prisma glitter on while paint is still wet.
3. Stamp any image that will fit nicely in the circle frame, on a 3"x 3" piece of premium white cardstock and color with Copics or any coloring medium of your choice. Next
I like to brayer haystack over the image to give it an additional aged look this step is optional.
4. Heat up your craft iron and run your beeswax over the plate melting it, iron onto your image... repeat until covered. Warning this technique is addictive!!! I love the smooth waxy finish and it looks wonderful with our new vintage stamps!
5. Trim image to fit ornament shape applying glue on the inter edges around circle on the inside of the cardboard. Cut a 7" piece of cording making a loop with a knot, Attach at the top point on the inside with a glue dot. Trim top of cord on tassel and attach at the bottom inside with another glue dot. Adhere to back ornament shape with zip dry. Attach velvet ribbon to front using a glue dot.
The photo of my finished ornament looks washed out, in real life it has a warm rich hue...
I hope you give these a try!
Wishing you a very Merry Christmas!


Wow, wow, wow!!!! Thanks, Kim for the wonderful tutorial! You rock! Gorgeous ornament, and wonderful instructions!
ReplyDeleteawesome ... thanks for sahring all of the details and directions!
ReplyDeleteKim -- you are brilliant! This project is so gorgeous, I couldn't wait to try it! Love it. I've never heard of ironing over beeswax, so neat.
ReplyDeleteWow Kim that ornament is gorgeous! Thanks for the tutorial & instructions :)
ReplyDelete