Wednesday, December 8, 2010

Captivating Keepsake Ornament Tutorial


Supplies:
T-517 Flowers And Holly
S-1900 Tuxedo Black Memento Ink
TT-216 Haystack Palette Ink/ Brayer (This step is optional)
Copic Markers YG13, G29, R37, R59, V09, V17
V-290 Premium White Cardstock
K-299 Labels 9 Nestabilitie (Largest Die)
K-296 Standard Circles Large (2 3/8" Die)
Beeswax & Craft Iron
Cording,Tassel and 3/8" Velvet Ribbon
Corrugated Cardboard
Lt.Ivory Acrylic Paint & A-287 Prisma Glitter
Glue Dots, Zip Dry Glue
On my lunch hour I came up with this idea for a "Captivating Keepsake" entry.... and I couldn't wait to get home to make these! I'm happy to be sharing them with you and I hope they become a keepsake that you can hand down... I've always loved anything old and these have that old vintage look!
It all started when I discovered the wonderful small rib corrugated cardboard in the priority mailing boxes.... LOVE LOVE LOVE this stuff!!!
1. First peel the white paper from the front of your box and cut to a manageable size to run through your die cutting machine, you will need to cut out 2 of the largest size Labels 9, next center the 2 3/8" circle die inside 1 of your shapes and run back through with your die cutting machine you now have 1 solid shape for the back and 1 shape with a circle cutout in the front that will frame your stamped image.
2. Dry brush these with lt. Ivory paint. Leave some cardboard showing through makes them look old, next pour prisma glitter on while paint is still wet.
3. Stamp any image that will fit nicely in the circle frame, on a 3"x 3" piece of premium white cardstock and color with Copics or any coloring medium of your choice. Next
I like to brayer haystack over the image to give it an additional aged look this step is optional.
4. Heat up your craft iron and run your beeswax over the plate melting it, iron onto your image... repeat until covered. Warning this technique is addictive!!! I love the smooth waxy finish and it looks wonderful with our new vintage stamps!
5. Trim image to fit ornament shape applying glue on the inter edges around circle on the inside of the cardboard. Cut a 7" piece of cording making a loop with a knot, Attach at the top point on the inside with a glue dot. Trim top of cord on tassel and attach at the bottom inside with another glue dot. Adhere to back ornament shape with zip dry. Attach velvet ribbon to front using a glue dot.

The photo of my finished ornament looks washed out, in real life it has a warm rich hue...
I hope you give these a try!
Wishing you a very Merry Christmas!

Saturday, November 13, 2010

Deck the Halls Blog Hop


I have three holiday cards to share with you today... Please click Here to check out more wonderful "Angel Company" creations on this blog hop...


My first card... was inspired by a card by Lisa Henke in the Nov/Dec Papercrafts magazine.


I stamped the poinsettia with Moonlight White Brilliance ink on kraft cs then mounted it to a red card base, I added a strip of corrugated cardboard that had been colored with a Copic marker and a silk poinsettia flower with a jingle bell. The sentiment was stamped with L'Amore Red Palette ink.


Stamps: T-3416 Poinsettia


On my second card I embossed the poinsettia with Galaxy Gold Brilliance ink & Clear EP and colored with my Copics, I stamped 3 of the flowers and cut apart so it would be 3 dimensional... using pop dots in between each layer. I also colored the ribbon & rhinestones with my Copics to match... it was mounted to some corrugated cardboard that I trimmed with lace and mounted to an ivory card base.
Stamps: T-3416 Poinsettia

My third card uses a Nestabilites Petite Oval and a Labels 8. I stamped the bird on my oval white cs die cut using Memento Rich Cocoa... I accented with my clear Stardust Gelly pen. I matted to a die cut shape of corrugated cardboard and another brown cs die cut shape, I embellished with red organza ribbon and attached to a red card base.
Stamps: T-3141 Peace
Thanks so much for stopping by!

Friday, October 29, 2010

Penelope Blessings Basket


Please join us in Flavors of Fall Blog Hop sponsored by Mischelle Smith of "The Angel Company"


I found this cute little wooden basket at my local craft store and knew it would be perfect to alter
for fall... The tag reads Hoping your fall is filled with blessings!
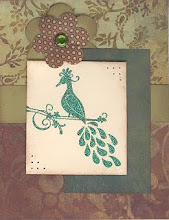
I thought it might be fun for each one in our family to write something they feel grateful for during this Thanksgiving season, and place it in the basket. After dinner we could pass it around the table and each pull one out to share!


Supplies Used
Paper: V-845 Penelope SWIC
Stamps: T-3377 Filled With Blessings
Ink: S-963 VersaMagic Eggplant, S-1900 Memento Tuxedo Black
Other: G-706 In Bloom Buttons & Blossoms, F-911 Brown Scrappers Floss,
Wooden Basket, Acrylic Paint, Adhesive

Thanks for stopping by and I hope you enjoy checking out the other wonderful TAC creations on this hop!


Sunday, August 22, 2010

August Angel Art Blog Hop


This months Angel Art blog hop was to feature any Fall or Halloween themed projects... Well the minute I saw this new Halloween Set by the Angel company
"Spiders Are Seen" I feel instantly in love with it!!! I have five cards to share that really showcase the versatility of this set and even better when you purchase it this month you receive a Rockin' Roxie Matchbook Kit FREE... It doesn't get much better than that!
Please be sure and check out the wonderful projects from these talented Angels below:
Thank you for stopping by!

Is your Comuter running slow?

My husband and I were talking about buying a new computer, because the one we’ve had now for several years was running slow and getting lots of errors. It was low on disc space and memory and we didn’t quiet no what to do other than replace it. But given the currant economy it was just not in our budget. Then I received an Email from Alise Johnson telling me about a product called “Digeus System Optimizer”. It is a simple to install and easy to use software that allows you to resolve the very computer problems we were experiencing. System Optimizer boosts PC & Internet speed up to 300%. It helps you find & delete duplicate files to regain valuable hard disc space. It clears the history of sites you have visited, supports all browsers & helps protects you from prying eyes. It also automatically identifies & repairs common Windows problems & removes invalid Registry entries increasing system performance & helps eliminate system crashes, freezes & slow downs. The following is a list of all the functions in the program which will allow you to get your system back on track & running smoothly.
1. Registry Cleaner
2. Registry Defragmenter
3. Junk File Cleaner
4. Duplicate File Cleaner
5. Disc Space Analyzer
6. Service Manager
7. Smart Uninstaller
8. Start Up Manager
9. Privacy Protection

My husband & I recommend the product and did not have to buy a new computer to be satisfied. The functions will take less time than setting up a new computer and trying to transfer files and all of that whole process. So we hope if you have some of the same problems we did you will give it a try. Just click on the link & you’ll be on your way to a faster smarter system.

Thanks,
Kim & Steve

Sunday, July 25, 2010

Christmas in July Angel Art Blog Hop


This months Angel Art Blog Hop is "Christmas in July" sponsered by Paper Wings an all angel site.
I would like to share a couple of quick cards I made using Vintage Santa,
This set came out last year and is one of my favorites!
My first card starts with a white card base that has been distressed along the edges with jumbo java ink, a brown layer of cs comes next. I stamped the Santa image and distressed and then matted to scarlet cs. I spritzed with our new frost shimmer this adds a lot of sparkle my photo doesn't do it justice... I stamped sentiment and mat to corrugated cardboard & hit with some frost simmer spritz too. The finishing touch is this adorable brown mini Pom Pom trim!

My second card is also a white card base that was distressed.. I added a scarlet cs layered to it... Next I used the new large scallop Nestabillitie die to cut my corrugated cardboard shape then adhered on top of red cs... stamped Santa on white cs, mat to brown cs and distressed & spritz with frost shimmer. To finish off I tied red twine with a tag stamped with a sentiment from the tiny tidbits set....

Stamps: T-3193 Vintage Santa, T-1186 Tag Tidbits

Ink: Memento Rich Cocoa,VersaMagic Jumbo Java

Paper: Scarlet CS, Ultrasmooth Wht. CS, Caboodles F

Mocha Divine CS, Corrugated Cardboard

Misc: Nestabillities Big Scallop Square, Frost Shimmer Mist,

Stardust Clear Gelly Pen, Red Twine, Die Cut Tag, Brown

Pom Pom Trim


Thank you for stopping by, be sure and check out these talented Angels below

for more Christmas in July Projects featuring The Angel Company Stamps!


Have A Wonderful Day!

Saturday, July 10, 2010

Angelee True Beauty

This is another card I did for a challenge on Paper Wings... The challenge was to use something you were saving in your stash, I used this beautiful paper rose that I have had since last September! Love how this one turned out, I seem to be really into the vintage collage style lately so this seems to have that flavor too!

Supplies
Stamps: T-3047 True Beauty
Paper: Angelee SWIC & CS, Ivory CS, White Computer Paper
Ink: Memento Rich Cocoa, Palette Haystack & Cognac
Misc; Paper Rose, Angelee Ribbon,Copics, Lemonade Buttons, Border Punch, Embossing Folder

Thanks so much for stopping by!

Related Posts with Thumbnails